
SvelteKitでネイティブアプリのようなWebアプリを作る
Webでアプリを作りたいなら?
Web技術でアプリを作れることをご存知でしたか? SvelteKitでWebアプリを作り、ExpoやFlutterのWebViewで包めば、すぐにApp Storeにリリースできます。
しかし、Webアプリには最大の弱点があります。それはページ遷移が不自然だということ。
ネイティブアプリは画面遷移が自然です。リストから詳細に入るときスライドし、画像をタップすると拡大しながら開きます。でもWebは? ページがただパッと変わります。
もしWebでもネイティブのようなページ遷移が可能なら? そのWebアプリは本物のアプリのように感じられるでしょう。
今日はSvelteKitでネイティブアプリのようなページトランジションを実装したWebアプリを作ります。
SSGOIとは?
SSGOI(スッゴイ)はすべてのブラウザで動作するページトランジションライブラリです。
ChromeのView Transition APIがありますが、SafariとFirefoxでは動作しません。SSGOIはこの問題を解決します。
SSGOIの利点:
- すべてのモダンブラウザをサポート (Chrome, Firefox, Safari, Edge)
- SSR/SSG完全互換
- スプリングベースの物理アニメーションで自然な動き
- 多様なビルトイントランジション (Drill, Slide, Pinterest, Instagramなど)
はじめに
SSGOI公式テンプレートから始めましょう。
# リポジトリをクローン
git clone https://github.com/meursyphus/ssgoi

# ルートで依存関係をインストール (重要!)
pnpm install

# SvelteKitテンプレートフォルダに移動
cd templates/sveltekit

# 開発サーバーを起動
pnpm run dev
注意:
pnpm installは必ずルートパスで実行する必要があります。モノレポ構造のため、ルートで全体の依存関係をインストールします。
ブラウザでhttp://localhost:5173を開くと、テンプレートデモを確認できます。
フォルダ構造を見る
templates/sveltekit/フォルダ構造です。
templates/sveltekit/
├── src/
│   ├── routes/
│   │   ├── +layout.svelte        # ルートレイアウト
│   │   ├── posts/                # Drillトランジション例
│   │   │   ├── +page.svelte
│   │   │   └── [id]/+page.svelte
│   │   ├── pinterest/            # Pinterestトランジション例
│   │   │   ├── +page.svelte
│   │   │   └── [id]/+page.svelte
│   │   ├── profile/              # Instagramトランジション例
│   │   │   ├── +page.svelte
│   │   │   └── [id]/+page.svelte
│   │   └── products/             # Slideトランジション例
│   │       ├── +layout.svelte
│   │       └── [category]/+page.svelte
│   └── lib/
│       ├── components/
│       │   ├── demo-layout.svelte  # Ssgoi設定 (核心!)
│       │   └── demo-wrapper.svelte # モバイルフレームUI
│       └── data/
核心ファイルはsrc/lib/components/demo-layout.svelteです。すべてのトランジション設定がここにあります。
Ssgoiを設定する
src/lib/components/demo-layout.svelteを開いてください。
<script lang="ts">
  import { Ssgoi } from '@ssgoi/svelte';
  import { drill, pinterest, instagram } from '@ssgoi/svelte/view-transitions';
  import { page } from '$app/stores';

  let { children } = $props();

  const config = {
    transitions: [
      // Pinterestトランジション
      {
        from: '/pinterest/*',
        to: '/pinterest',
        transition: pinterest(),
        symmetric: true,
      },
      // Posts - Drillトランジション
      {
        from: '/posts',
        to: '/posts/*',
        transition: drill({ direction: 'enter' }),
      },
      {
        from: '/posts/*',
        to: '/posts',
        transition: drill({ direction: 'exit' }),
      },
      // Profile - Instagramトランジション
      {
        from: '/profile',
        to: '/profile/*',
        transition: instagram(),
        symmetric: true,
      },
    ],
  };
</script>

<main>
  <Ssgoi {config}>
    {@render children()}
  </Ssgoi>
</main>
config構成:
from: 出発パス (*はワイルドカード)to: 到着パスtransition: 使用するトランジションsymmetric: 逆方向も同じトランジションを適用
SsgoiTransitionでページを包む
各ページはSsgoiTransitionで包み、一意のidを付ける必要があります。
src/routes/posts/+page.svelteを見ると:
<script lang="ts">
  import { SsgoiTransition } from '@ssgoi/svelte';
  import { getAllPosts } from '$lib/data/posts';

  const posts = getAllPosts();
</script>

<SsgoiTransition id="/posts">
  <div class="min-h-full bg-[#121212] px-4 py-6">
    <!-- 投稿リスト -->
  </div>
</SsgoiTransition>
src/routes/posts/[id]/+page.svelteを見ると:
<script lang="ts">
  import { SsgoiTransition } from '@ssgoi/svelte';
  import { getPost } from '$lib/data/posts';
  import { page } from '$app/stores';

  const postId = $page.params.id;
  const post = getPost(postId);
</script>

<SsgoiTransition id="/posts/{postId}">
  <div class="min-h-screen bg-[#121212]">
    <!-- 投稿詳細 -->
  </div>
</SsgoiTransition>
核心:
idはconfigのfrom/toとマッチする必要があり、SSGOIがトランジションを適用します。
Drillトランジション
リストから詳細に入る感じのトランジションです。
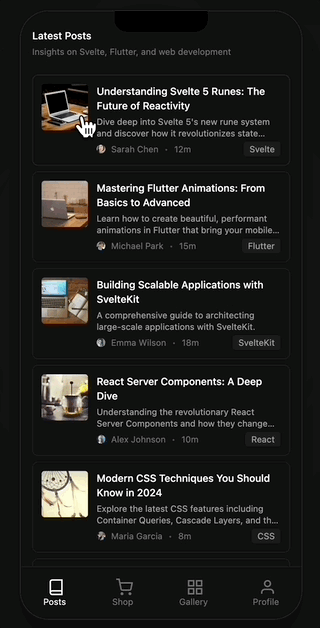
テンプレート位置: src/routes/posts/
<script lang="ts">
  import { drill } from '@ssgoi/svelte/view-transitions';

  // リスト → 詳細 (入るとき)
  drill({ direction: 'enter' });

  // 詳細 → リスト (出るとき)
  drill({ direction: 'exit' });
</script>
config設定:
{
  from: '/posts',
  to: '/posts/*',
  transition: drill({ direction: 'enter' }),
},
{
  from: '/posts/*',
  to: '/posts',
  transition: drill({ direction: 'exit' }),
},
オプション:
direction:"enter"|"exit"opacity:trueならフェード効果を追加
Slideトランジション
タブUIで左右にスライドする効果です。
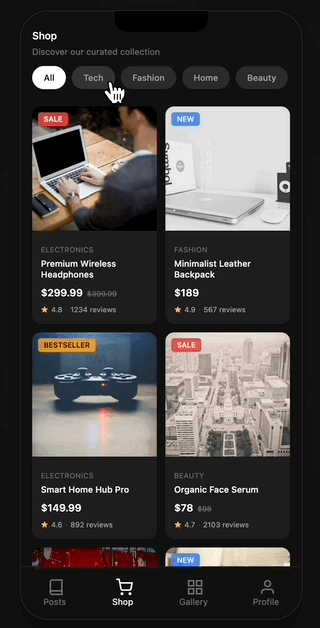
テンプレート位置: src/routes/products/+layout.svelte
<script lang="ts">
  import { slide } from '@ssgoi/svelte/view-transitions';

  // 左にスライド
  slide({ direction: 'left' });

  // 右にスライド
  slide({ direction: 'right' });
</script>
products/+layout.svelteでは、ネストされたSsgoiを使ってタブ領域だけトランジションします:
<script lang="ts">
  import { Ssgoi, SsgoiTransition } from '@ssgoi/svelte';
  import { slide } from '@ssgoi/svelte/view-transitions';
  import { page } from '$app/stores';

  let { children } = $props();

  const config = {
    transitions: [
      {
        from: '/products/tab/left',
        to: '/products/tab/right',
        transition: slide({ direction: 'left' }),
      },
      {
        from: '/products/tab/right',
        to: '/products/tab/left',
        transition: slide({ direction: 'right' }),
      },
    ],
  };
</script>

<SsgoiTransition id="/products">
  <!-- ヘッダー、タブボタン -->
  <div class="flex-1 overflow-hidden">
    <Ssgoi {config}>
      {@render children()}
    </Ssgoi>
  </div>
</SsgoiTransition>
Pinterestトランジション
ギャラリー画像が拡大しながら詳細に遷移する効果です。
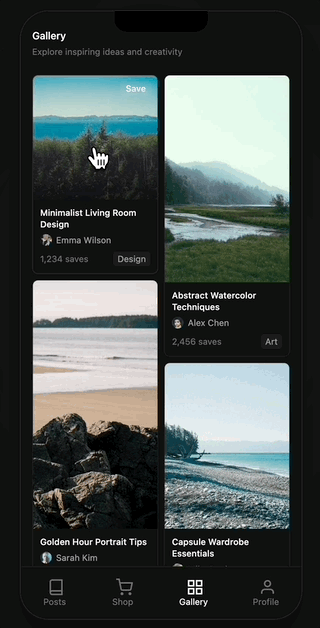
テンプレート位置: src/routes/pinterest/
Data属性設定 (必須!)
Pinterestトランジションはdata属性でどの画像同士が接続されるか指定する必要があります。
src/routes/pinterest/+page.svelte (ギャラリー):
<script lang="ts">
  import { pinterestItems } from '$lib/data/pinterest';
</script>

{#each pinterestItems as item (item.id)}
  <a href="/pinterest/{item.id}">
    <div class="relative" style="aspect-ratio: {item.aspectRatio}">
      <img
        src={item.image}
        alt={item.title}
        class="w-full h-full object-cover"
        data-pinterest-gallery-key={item.id}
      />
    </div>
  </a>
{/each}
src/routes/pinterest/[id]/+page.svelte (詳細):
<script lang="ts">
  import { SsgoiTransition } from '@ssgoi/svelte';
  import { getPinterestItem } from '$lib/data/pinterest';
  import { page } from '$app/stores';

  const pinId = $page.params.id;
  const item = getPinterestItem(pinId);
</script>

<SsgoiTransition id="/pinterest/{pinId}">
  <img
    src={item.image}
    alt={item.title}
    style="aspect-ratio: {item.aspectRatio}"
    data-pinterest-detail-key={item.id}
  />
</SsgoiTransition>
核心:
data-pinterest-gallery-keyとdata-pinterest-detail-keyに同じidを入れる必要があり、SSGOIが接続を認識します。
config設定:
{
  from: '/pinterest/*',
  to: '/pinterest',
  transition: pinterest(),
  symmetric: true,
}
Instagramトランジション
プロフィールフィードグリッドから詳細に遷移する効果です。Pinterestと似ていますが、ギャラリーがそのまま維持されます。
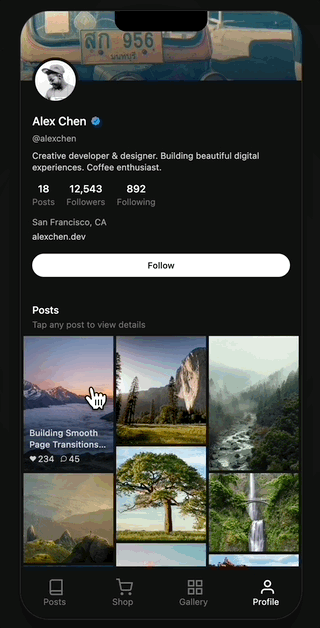
テンプレート位置: src/routes/profile/
Data属性設定
src/routes/profile/+page.svelte (グリッド):
<script lang="ts">
  import { posts } from '$lib/data/profile';
</script>

{#each posts as post (post.id)}
  <a href="/profile/{post.id}">
    <img
      src={post.coverImage.url}
      alt={post.title}
      class="w-full h-auto object-cover"
      data-instagram-gallery-key={post.id}
    />
  </a>
{/each}
src/routes/profile/[id]/+page.svelte (詳細):
<script lang="ts">
  import { SsgoiTransition } from '@ssgoi/svelte';
  import { getPost } from '$lib/data/profile';
  import { page } from '$app/stores';

  const postId = $page.params.id;
  const post = getPost(postId);
</script>

<SsgoiTransition id="/profile/{postId}">
  <img
    src={post.coverImage.url}
    alt={post.title}
    style="aspect-ratio: {post.coverImage.aspectRatio}"
    data-instagram-detail-key={post.id}
  />
</SsgoiTransition>
config設定:
{
  from: '/profile',
  to: '/profile/*',
  transition: instagram(),
  symmetric: true,
}
Springオプションでタイミング調整
すべてのトランジションはスプリングベースの物理アニメーションを使用します。springオプションで速度と感覚を調整できます。
<script lang="ts">
  drill({
    direction: 'enter',
    spring: {
      stiffness: 200, // 高いほど速い
      damping: 20, // 高いほど跳ねない
      doubleSpring: true, // ease-in-out効果をオンにする
    },
  });
</script>
Springオプション説明
| オプション | 説明 | 効果 |
|---|---|---|
stiffness | 剛性 | 高いほど速く即座に |
damping | 減衰 | 高いほど跳ねず滑らか |
doubleSpring | ダブルスプリング | true/false - ease-in-out効果 |
doubleSpringとは? CSSのease-in-outのように開始と終了が滑らかな効果です。詳細はDouble Springブログ記事を参照してください。
便利なオプション
symmetricオプション
双方向トランジションを自動設定します。
// このように1つだけ設定すると
{
  from: '/pinterest/*',
  to: '/pinterest',
  transition: pinterest(),
  symmetric: true,
}

// 逆方向も自動適用されます
ワイルドカードルート
*ですべてのサブパスをマッチします。
// /posts/1, /posts/abcすべてマッチ
{ from: '/posts', to: '/posts/*', ... }
まとめ
これで皆さんもSvelteKit Webアプリにネイティブのようなページトランジションを適用できます!
リソース
- GitHub: https://github.com/meursyphus/ssgoi
- 公式ドキュメント: https://ssgoi.dev
- SvelteKitテンプレート: https://github.com/meursyphus/ssgoi/tree/main/templates/sveltekit
WebViewで包んで本物のアプリにしてみてください!