
Building Native App-like Web Apps with Next.js
Want to Build Apps with Web Technologies?
Did you know you can build apps using web technologies? Create a web app with Next.js, wrap it with a webview using Expo or Flutter, and you can publish it directly to the App Store.
However, web apps have a major weakness: awkward page transitions.
Native apps have smooth screen transitions. When navigating from a list to detail view, it slides naturally. When you tap an image, it expands and opens smoothly. But web? Pages just abruptly change.
What if you could have native-like page transitions on the web? That web app would feel like a real app.
Today, we'll build a web app with native app-like page transitions using Next.js.
What is SSGOI?
SSGOI is a page transition library that works in all browsers.
Chrome has the View Transition API, but it doesn't work in Safari and Firefox. SSGOI solves this problem.
SSGOI Benefits:
- Supports all modern browsers (Chrome, Firefox, Safari, Edge)
- Perfect compatibility with SSR/SSG
- Natural movement with spring-based physics animations
- Various built-in transitions (Drill, Slide, Pinterest, Instagram, etc.)
Getting Started
Let's start with the official SSGOI template.
# Clone the repository
git clone https://github.com/meursyphus/ssgoi

# Install dependencies from the root (important!)
pnpm install

# Navigate to the Next.js template folder
cd templates/nextjs

# Run the development server
pnpm run dev
Note: You must run
pnpm installfrom the root directory. Since it's a monorepo structure, you need to install all dependencies from the root.
Open http://localhost:3000 in your browser to see the template demo.
Understanding the Folder Structure
Here's the templates/nextjs/ folder structure.
templates/nextjs/
├── src/
│   ├── app/
│   │   ├── layout.tsx          # Root layout
│   │   ├── posts/              # Drill transition example
│   │   │   ├── page.tsx
│   │   │   └── [id]/page.tsx
│   │   ├── pinterest/          # Pinterest transition example
│   │   │   ├── page.tsx
│   │   │   └── [id]/page.tsx
│   │   ├── profile/            # Instagram transition example
│   │   │   ├── page.tsx
│   │   │   └── [id]/page.tsx
│   │   └── products/           # Slide transition example
│   │       ├── layout.tsx
│   │       └── [category]/page.tsx
│   └── components/
│       ├── demo-layout.tsx     # Ssgoi configuration (core!)
│       ├── demo-wrapper.tsx    # Mobile frame UI
│       ├── posts/
│       ├── pinterest/
│       ├── profile/
│       └── products/
The core file is demo-layout.tsx. All transition configurations are here.
Configuring Ssgoi
Open src/components/demo-layout.tsx.
"use client";

import { Ssgoi } from "@ssgoi/react";
import { drill, pinterest, instagram } from "@ssgoi/react/view-transitions";
import { useMemo } from "react";

export default function DemoLayout({
  children,
}: {
  children: React.ReactNode;
}) {
  const config = useMemo(
    () => ({
      transitions: [
        // Pinterest transition
        {
          from: "/pinterest/*",
          to: "/pinterest",
          transition: pinterest(),
          symmetric: true,
        },
        // Posts - Drill transition
        {
          from: "/posts",
          to: "/posts/*",
          transition: drill({ direction: "enter" }),
        },
        {
          from: "/posts/*",
          to: "/posts",
          transition: drill({ direction: "exit" }),
        },
        // Profile - Instagram transition
        {
          from: "/profile",
          to: "/profile/*",
          transition: instagram(),
          symmetric: true,
        },
      ],
    }),
    [],
  );

  return (
    <main>
      <Ssgoi config={config}>{children}</Ssgoi>
    </main>
  );
}
Config structure:
from: Source path (*is a wildcard)to: Destination pathtransition: Transition to usesymmetric: Apply the same transition in reverse
Wrapping Pages with SsgoiTransition
Each page must be wrapped with SsgoiTransition and given a unique id.
Looking at src/components/posts/index.tsx:
import { SsgoiTransition } from "@ssgoi/react";

export default function PostsDemo() {
  return (
    <SsgoiTransition id="/posts">
      <div className="min-h-screen bg-[#121212] px-4 py-6">
        {/* Post list */}
      </div>
    </SsgoiTransition>
  );
}
Looking at src/components/posts/detail.tsx:
export default function PostDetail({ postId }: { postId: string }) {
  return (
    <SsgoiTransition id={`/posts/${postId}`}>
      <div className="min-h-screen bg-[#121212]">{/* Post detail */}</div>
    </SsgoiTransition>
  );
}
Key Point: The
idmust match thefrom/toin the config for SSGOI to apply transitions.
Drill Transition
A transition that gives the feeling of entering from a list to detail view.
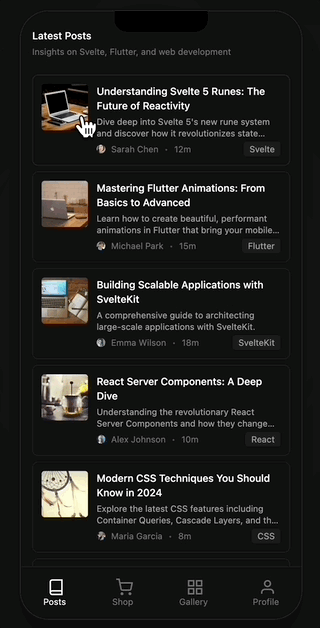
Template location: src/components/posts/
import { drill } from "@ssgoi/react/view-transitions";

// List → Detail (entering)
drill({ direction: "enter" });

// Detail → List (exiting)
drill({ direction: "exit" });
Config setup:
{
  from: "/posts",
  to: "/posts/*",
  transition: drill({ direction: "enter" }),
},
{
  from: "/posts/*",
  to: "/posts",
  transition: drill({ direction: "exit" }),
},
Options:
direction:"enter"|"exit"opacity: Iftrue, adds fade effect
Slide Transition
Horizontal slide effect for tab UI.
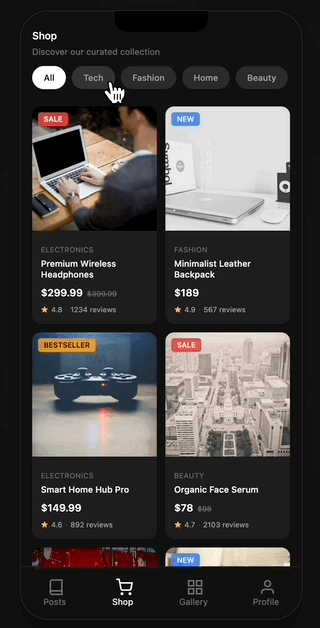
Template location: src/app/products/layout.tsx
import { slide } from "@ssgoi/react/view-transitions";

// Slide to the left
slide({ direction: "left" });

// Slide to the right
slide({ direction: "right" });
In products/layout.tsx, a nested Ssgoi is used to transition only the tab area:
export default function ProductsLayout({
  children,
}: {
  children: React.ReactNode;
}) {
  const config = useMemo(
    () => ({
      transitions: [
        {
          from: "/products/tab/left",
          to: "/products/tab/right",
          transition: slide({ direction: "left" }),
        },
        {
          from: "/products/tab/right",
          to: "/products/tab/left",
          transition: slide({ direction: "right" }),
        },
      ],
    }),
    [],
  );

  return (
    <SsgoiTransition id="/products">
      {/* Header, tab buttons */}
      <div className="flex-1 overflow-hidden">
        <Ssgoi config={config}>{children}</Ssgoi>
      </div>
    </SsgoiTransition>
  );
}
Pinterest Transition
An effect where gallery images expand into detail view.
Template location: src/components/pinterest/
Setting Data Attributes (Required!)
Pinterest transitions require data attributes to specify which images are connected.
src/components/pinterest/index.tsx (gallery):
function PinCard({ item }: { item: PinterestItem }) {
  return (
    <Link href={`/pinterest/${item.id}`}>
      <div className="relative" style={{ aspectRatio: item.aspectRatio }}>
        <img
          src={item.image}
          alt={item.title}
          className="w-full h-full object-cover"
          data-pinterest-gallery-key={item.id}
        />
      </div>
    </Link>
  );
}
src/components/pinterest/detail.tsx (detail):
export default function PinterestDetail({ pinId }: { pinId: string }) {
  const item = getPinterestItem(pinId);

  return (
    <SsgoiTransition id={`/pinterest/${pinId}`}>
      <img
        src={item.image}
        alt={item.title}
        style={{ aspectRatio: item.aspectRatio }}
        data-pinterest-detail-key={item.id}
      />
    </SsgoiTransition>
  );
}
Key Point: Use the same id in
data-pinterest-gallery-keyanddata-pinterest-detail-keyfor SSGOI to recognize the connection.
Config setup:
{
  from: "/pinterest/*",
  to: "/pinterest",
  transition: pinterest(),
  symmetric: true,
}
Instagram Transition
An effect that transitions from a profile feed grid to detail view. Similar to Pinterest, but the gallery remains visible.
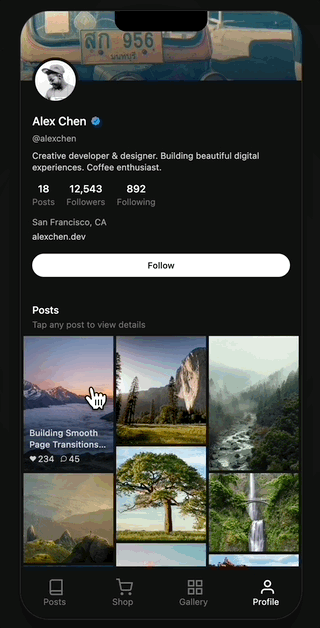
Template location: src/components/profile/
Setting Data Attributes
src/components/profile/feed.tsx (grid):
function PostCard({ post }: { post: Post }) {
  return (
    <Link href={`/profile/${post.id}`}>
      <img
        src={post.coverImage.url}
        alt={post.title}
        className="w-full h-auto object-cover"
        data-instagram-gallery-key={post.id}
      />
    </Link>
  );
}
src/components/profile/feed-detail.tsx (detail):
export default function FeedDetail({ postId }: { postId: string }) {
  const post = getPost(postId);

  return (
    <SsgoiTransition id={`/profile/${postId}`}>
      <img
        src={post.coverImage.url}
        alt={post.title}
        data-instagram-detail-key={post.id}
      />
    </SsgoiTransition>
  );
}
Config setup:
{
  from: "/profile",
  to: "/profile/*",
  transition: instagram(),
  symmetric: true,
}
Adjusting Timing with Spring Options
All transitions use spring-based physics animations. You can adjust speed and feel with the spring option.
drill({
  direction: "enter",
  spring: {
    stiffness: 200, // Higher = faster
    damping: 20, // Higher = less bouncy
    doubleSpring: true, // Enable ease-in-out effect
  },
});
Spring Options Explained
| Option | Description | Effect |
|---|---|---|
stiffness | Stiffness | Higher = faster and more responsive |
damping | Damping | Higher = less bouncy and smoother |
doubleSpring | Double Spring | true/false - ease-in-out effect |
What is doubleSpring? It's a smooth effect at the start and end, similar to CSS ease-in-out. For more details, see the Double Spring blog post.
Useful Options
symmetric Option
Automatically sets bidirectional transitions.
// Just set this one
{
  from: "/pinterest/*",
  to: "/pinterest",
  transition: pinterest(),
  symmetric: true,
}

// Reverse direction is automatically applied
Wildcard Routes
Use * to match all sub-paths.
// Matches /posts/1, /posts/abc, etc.
{ from: "/posts", to: "/posts/*", ... }
Wrapping Up
Now you can apply native-like page transitions to your Next.js web apps!
Resources
- GitHub: https://github.com/meursyphus/ssgoi
- Official Documentation: https://ssgoi.dev
- Next.js Template: https://github.com/meursyphus/ssgoi/tree/main/templates/nextjs
Wrap it in a webview and turn it into a real app!